
The Pre-Trip Inspection Nightmare: How to Memorize 100 Parts in 15 Minutes (2026 Guide)
The Pre-Trip Inspection is the #1 reason students fail their CDL road test. Stop panicking and start using our "Chunking Strategy," the "Magic Mantra," and the "LAB" script to pass easily.

You passed your Permit Test. You practiced your backing maneuvers in the yard until your neck hurt. Now, you are standing in front of a grumpy DMV examiner with a clipboard.
It is time for the Pre-Trip Inspection.
This is where a large share of CDL candidates fail immediately. Not because they can't drive, but because they freeze up. They forget the name of a hose, or they skip the "LAB" brake test.
The Pre-Trip requires you to point to, touch, and describe over 100 parts on the truck in under 45 minutes. It feels overwhelming. But here is the secret: It is not a mechanics test. It is a script.
You don't need to know how an alternator generates electricity. You just need to know the "Magic Words" to describe it. With our "Chunking Method," you can memorize the entire script in about 15 minutes of focused study.
1. The "Magic Mantra" (80% of the Test)
The biggest mistake students make is trying to invent a new description for every part. Don't do that. You only need to learn ONE phrase, and repeat it 50 times during the exam.
The Phrase (For Metal Parts):
"Securely mounted, not cracked, bent, or broken."
The Phrase (For Rubber Parts like Hoses/Tires):
"Securely mounted, not cracked, frayed, or leaking. No abrasions, bulges, or cuts."
How to use it:
- Point to the Alternator: "Securely mounted, not cracked, bent, or broken."
- Point to the Steps: "Securely mounted, not cracked, bent, or broken."
- Point to the Exhaust: "Securely mounted, not cracked, bent, or broken."
This creates a rhythm. It calms your nerves and shows the examiner you have a system.
2. Zone A: The Engine Compartment (Driver vs. Passenger)
Open the hood. It looks like a mess of wires. Break it down into two sides.
The "Belt vs. Gear" Trap
You must know which parts are Belt Driven and which are Gear Driven. If you get this wrong, it is an automatic point deduction.
Passenger Side:
- Alternator: "Securely mounted. Wires are tight. Belt Driven." (Important: Mention the belt has no more than 3/4 inch of play).
- Water Pump: "Securely mounted, not leaking. Belt Driven."
- Coolant Reservoir: "Not leaking, filled to the proper level."
Driver Side (The Critical Side):
- Air Compressor: "Securely mounted, not leaking air. Gear Driven."
- Power Steering Pump: "Securely mounted, not leaking fluid. Gear Driven."
- Steering Box: "Securely mounted, not leaking. No missing nuts or bolts."
Insider Tip: The "Touch" Rule
Examiners are trained to watch your hands. If you just point vaguely at the engine, they might not give you credit. Physically touch the part (or point with a stick) as you name it. It proves you aren't guessing.
Ready to Start?
Find the best CDL training centers in your area:
3. The Steering Linkage (Don't Mix Them Up)
This is where students get confused. Memorize the order from top to bottom:
- Pitman Arm (Connected to the steering box).
- Drag Link (Connects Pitman arm to the wheel).
- Tie Rod (Connects the two wheels).
"All are securely mounted, not cracked, bent, or broken. Held in place by Castled Nuts and Cotter Pins." (Don't forget the pins!)
4. The Suspension & Brakes (The Repeater)
The good news: Once you memorize one wheel, you just repeat the script for the drive axles and trailer axles.
The Suspension Trio
- Springs: "Not cracked, shifted, or missing."
- U-Bolts: "None missing, tight to the axle."
- Shock Absorber: "Securely mounted, not leaking oil."
The Brake System
This is safety-critical. Look inside the wheel.
- Brake Chamber: "Not cracked, dented, or leaking air. Clamp is tight."
- Slack Adjuster & Push Rod: "With brakes released, I should not be able to pull the push rod more than 1 inch." (Saying "1 inch" is required).
- Brake Drums & Linings: "No oil or grease. Linings are not dangerously thin."
5. Zone B: The Coupling System (The "Kill Zone")
This connects the tractor to the trailer. If you miss a detail here, the trailer could detach on the highway. Examiners are brutal on this section.
You need to check these 5 items specifically:
- Apron: The bottom of the trailer. "Not bent or cracked."
- Skid Plate: The top of the fifth wheel. "Properly greased."
- The Gap: "There should be NO DAYLIGHT between the apron and the skid plate." (Shout this part).
- Release Arm: "Locked in the fully engaged position."
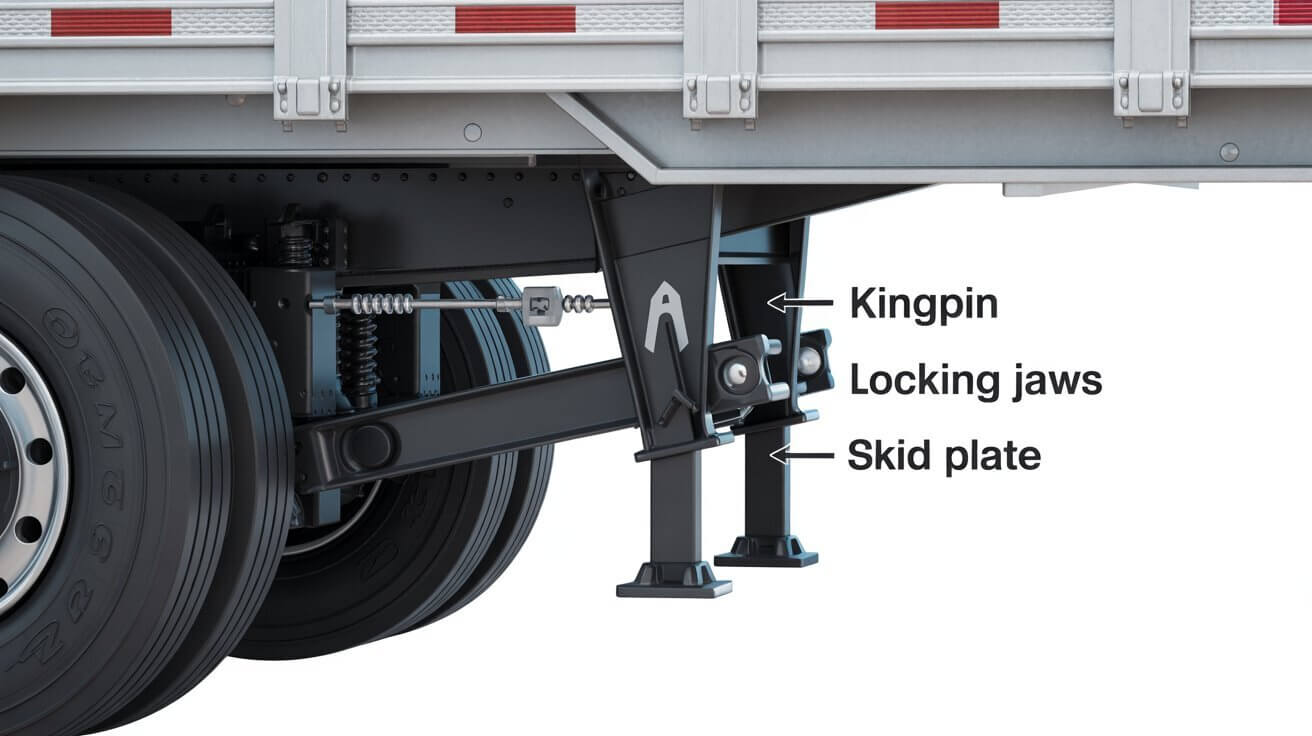
- Kingpin & Locking Jaws: (Look under with a flashlight). "The Kingpin is not bent. The Locking Jaws are fully closed around the shank of the Kingpin."
6. In-Cab Inspection: The "LAB" Test (Automatic Fail)
You climb inside. You check your seatbelt, your mirrors, your gauges (Oil, Voltage, Air). That's the easy part.
Now comes the Air Brake Test. This is where many students fail instantly.
You MUST perform the "LAB" sequence in order. If you get it wrong, the test is over.
The "LAB" Script (Memorize Word-for-Word)
Step 0: Turn engine OFF. Turn key ON (electricity). Push in BOTH valves (Yellow and Red) to release brakes. Wait for gauges to settle.
1. L - Leaks:
"I will now press and hold the brake pedal for one minute. I should not lose more than 4 PSI in one minute."
(Wait a full 60 seconds. Watch the gauge. Then announce: "I did not lose more than 4 PSI.")
2. A - Alarms:
"I will now pump the brake pedal to lower the pressure. The Low Air Warning Light and Buzzer should come on at 60 PSI."
(Pump until it beeps. Announce: "The alarm is working.")
3. B - Buttons:
"I will continue pumping. The Emergency Brake Valves (Buttons) should pop out between 20 and 45 PSI."
(Pump until they pop. Announce: "The buttons have popped out.")
*Note: These numbers reflect 2026 Federal Standards. Verify with your specific State CDL Manual.
7. What if You "Brain Freeze"?
It happens. You are staring at the side of the truck, the examiner is tapping their foot, and your mind goes blank.
Don't panic.
- Use the "General" term: Can't remember "Lateral Shock Dampener"? Call it a "Shock Absorber." Can't remember "Serpentine Belt"? Call it a "Belt." As long as you describe its condition correctly ("not frayed"), you usually get the point.
- Look at the truck, not the examiner: The truck has the answers. Follow the flow of the parts (Air goes from tank -> line -> chamber).
- Ask to "Come Back": If you forget the Engine Oil dipstick, keep going. Before you finish the engine section, say: "I would like to go back and check the oil level." Most examiners allow this as long as you haven't moved to the next zone.
The Bottom Line
The Pre-Trip Inspection is not a test of your mechanical skills. It is a test of your discipline.
The examiner wants to know: "Does this person care enough about safety to check the truck every morning?"
Speak loudly. Point clearly. Use your mantra. And for the love of God, do not forget the "LAB" test.
Next Step: Practice this script on your personal car. Point to your alternator. Check your tires. Build the muscle memory before you get to school.
For the official legal checklist, refer to Section 11 of the FMCSA Regulations Part 396.11.
Ready to Find CDL Schools?
Search for CDL training programs in your area. Start your journey to becoming a professional truck driver today.
Find CDL Schools Near YouRelated Articles

The Ultimate Guide to Passing the CDL Permit Test (CLP) in 2026
Dreading the written exam? Stop reading the 180-page DMV manual. Here is the massive, step-by-step strategy to crush General Knowledge, Air Brakes, and Combination Vehicles on your first try.